Showing posts with label how to. Show all posts

Wednesday, December 10, 2014

Gift Tags - Free Printable

Seasons Greetings from 
the Hudson Valley Etsy Team!
Our Holiday Craft Fair in Beacon is only weeks away.  Get ready to give with these fennec fox gift tags you can print at home.  Have your special persons been naughty or nice this year?


Click on link below for Naughty and Nice pdf
https://drive.google.com/open?id=0B4emWuO6AltReEc0eEZfWldyNXM&authuser=0

Instructions:
  1. Print out the downloaded file on a sheet of card stock
  2. Cut out each tag along the pale blue lines - use scissors, x-acto knife & ruler or paper cutter.
  3. Punch out holes with a hole punch or just attach to your gift with tape or glue. I also drew in gold marker along the edges for more decoration.


All images © Jody A Lee 2014
www.astudiobythesea.etsy.com
This gift tag sheet is for your personal use only
All commercial use of them or these images is prohibited


Happy Holidays!


Jody 

Monday, February 24, 2014

A New Year, A New Project

As a creator of mosaics, I am drawn to the patterns and colors of china and pottery. In my studio, there are stacks of plates, bowls, and teacups, that are waiting to be incorporated into a mosaic. There are also several bins full of leftover shards from the pieces of dishes that didn’t make it into a mosaic. 


Recently, I have been experimenting with utilizing leftover shards to make shard pendants, with a soldered edging.  

To learn the process, I purchased a book called Simple Soldered Jewelry & Accessories, written by Lisa Bluhm.  This book gives instructions on tools and supplies that are needed, and provides easy to follow visual instructions on the process of soldering.


I bought the most essential supplies first, to give myself time to decide if this is a project that I wanted to pursue.  I purchased a soldering kit from Michaels, which included a soldering iron, a roll of copper foil, and a container of solder.
My most used tool, a tile nipper is what I used to cut a particular design out of a dish, or to even out the sharp edges of an existing china shard.


Copper foil, which has one sticky side, is wrapped around the edges of the shard, pressed down, and smoothed. Then using the soldering iron, solder is melted over the foil, and pulled around the front, side and back edges, with the tip of the soldering iron; sort of like painting with the solder.  The copper foil should be covered completely with solder.  A jump ring is soldered in place.


There is so much more to learn about different metals, melting temperatures, and materials  that can be used.  Now, I am ready to purchase more supplies and tools, and with more practice, I may be able to refine, and perfect my technique.

Monday, July 8, 2013

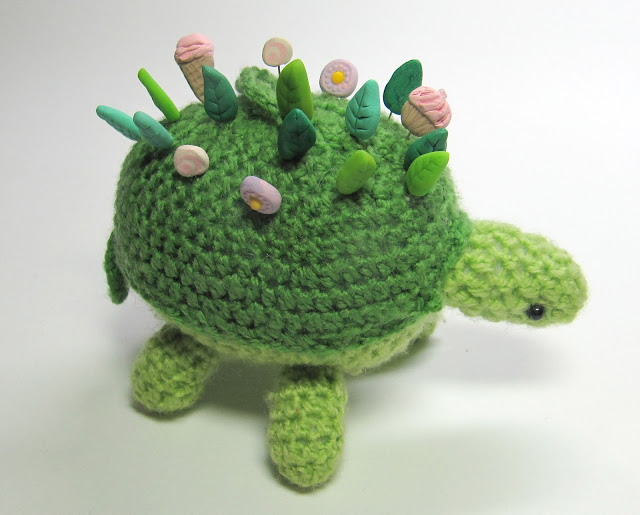
DIY Leaf Pincushion Pins

 Leaf Pincushion Pins Tutorial

For all you crafters who sew, or know someone who sews, here's a little way to green up your pincushions!

Materials:

Sculpey
x-acto blade or even a toothpick will do
foil
flat top pins or needles from the dollar store


Choose or make various shades of green by mixing the ready made colors with white or clear sculpey.  Just knead the two shades together until blended.  Roll into a tube, and cut some slices.


Make a leaf shape of a slice by rolling it into a ball, flattening it, and pinching one end.  Push in the pin or needle, and push the clay back onto the puncture so it's sealed.  Its nice to have decorative pin heads that are flat, as they are easier on the fingers and okay to iron over.


Gently press the x-acto blade or toothpick onto the top of the sculpey to make the veins of the leaf.


I got some leather punch tools to press into my sculpey pins as well!


 Place or even make the pins right on top of a small piece aluminum foil.  That way you don't even have to move them after you've formed them, which usually distorts their sides.  Bake at 275 degrees for 10 minutes and they are done!  So simple and fun!

Easter Egg by Vanessa of the Pudgy Rabbit
The Garden Party Tortoise goes on his way to new projects


Jody
www.astudiobythesea.etsy.com

Monday, May 6, 2013

In My Studio: Quality Control


Sarah with a basket making group in Northern Namibia

I was lucky enough to work in Namibia in Southern Africa for 3 years helping crafts people to make and sell products for the burgeoning tourism industry.
The crafts were mainly made from natural resources such as basketry, wood carving and pottery. I helped to design products they could make which would both appeal to tourists and be easily transported.
One of the main problems with the products was maintaining good quality control. As one way to illustrate this for people who spoke many different languages we came up with a list of '10 Commandments For Making Quality Craft Products'. 
I was looking at this the other day and was amazed how relevant  it is to crafts people everywhere- including us. So I thought I would share these Namibian 10 Commandments so we can all keep in mind the importance of quality control and to remember that we are only a small part of a much larger community of crafts people working all over the world.


 Quality is remembered long after the price is forgotten. Gucci Family Slogan


Good Luck and Good Making!

by Sarah Omura, SO Handmade


Monday, March 25, 2013

DIY: Matting & Framing Art Part 2


DIY: Matting & Framing Art
Part 2


Acid free glue
Acid free mounting tape
Weights (stray books)
Ruler

In Part 1 I removed the art from the illustration board and measured and cut my mats.  Using acid free glue in all four corners, I glue the two colored mats together.


I make sure the sides of the window of the mat line up evenly, and then weight the corners down with a few stray paperbacks to make sure the mats adhere to each other as they dry.  By the way, I was framing 3 different paintings at this time, so the art and colors of mat board do change in the demonstration pictures.


Place the backing board right up to the top of the mat, top/surface/showing side facing down and use masking tape to keep it in place.  Cut two or more acid free tapes to act as hinges and glue in place.  These too may need a book weight on them to keep them in place until they dry.


When dry, remove the masking tape, and fold down the hinged double mat over the backing board.  3 finished mats, ready for use!


Lift the mat and insert the artwork.


 If there are vertical and/or horizontal lines in the artwork, use a ruler to make sure they are parallel to the lines of the mat.  Gently shift the art around and make sure no outside edges appear - the mat completely covers the art on all sides.


Tape the art in place with masking tape, carefully keeping the art in place with one hand.


Flip open the mat.  With more acid free hinges, tape or glue the artwork in place at the top of the painting.  Art and paper breathes and expands, especially depending on how much moisture there is in the air.  So I attach the art only from the top so it doesn't wrinkle from being caught on the bottom.


And again, weight the hinges as they dry, 15 minutes to a half hour.


Remove the masking tape, fold back over the double mat, and the matting part of this tutorial is finished!


Part 3 will cover framing.


Jody

www.astudiobythesea.com
www.jodylee.org

[Etsy+avatar.jpg]

Monday, March 4, 2013

DIY: Matting & Framing Your Art


DIY: Matting & Framing Your Art
Part 1

Tools, Material and  Equipment 

mat knife or x-acto blade
large tube 
mat cutter with straight and bevel cutters
long straight rule 30"-36"
acid free mat board
acid free backing board or foamcore
superfine sandpaper
art on paper board

When I decide to show my art at an art show, I do most of my own matting and framing to save on costs and to present my work in the manner I prefer.  I was taught the basics of this skill in a Printmaking class in art college and it really does come in handy.  It isn't very hard but it is time consuming, so this DIY is in three parts.  Since I do most of my art on illustration board, this means removing the acid free surface layer that the image sits on from the heavy backing board.  I cut a slit along one edge with an x-acto blade and begin carefully pulling the top white layer away from the backing board.


 Once I get enough of a lip going, I use an old mailing tube to begin rolling up the top layer.  This is done by holding the paper tightly to the tube and separating the two layers very slowly and carefully, checking all the time that I'm not ripping through the image.


The top image layer may tend to curl after this, and I just slip it under some heavy boards for a few days  until it flattens out.


I choose to double mat my art, and I look for board colors that will enhance and complement the artwork.  Because this art had a brown and ivory center with a black border, surrounded by blue gray stone flowers, I thought a brown and beige mat with a black frame would suit it best.  I use Bainbridge Alphamat and an acid free foamcore board for the new backing board.  The acid in normal, everyday papers cause it to yellow, become brittle and decay in a few years so that is why we want to avoid using anything that isn't acid free or 100% Rag.


 I measure the art, leaving 1/4" to be covered by the mat, while the "arms" of the mat will be 3 3/4" wide.  You can choose what ever width you like, but the larger the art, the greater the width should be.  I usually do 4" or more, but I think this artwork had some odd dimensions for framing.  Note that I don't talk about the width of the opening.  I find it easier to deal with consistent small numbers measured from the outside edges.


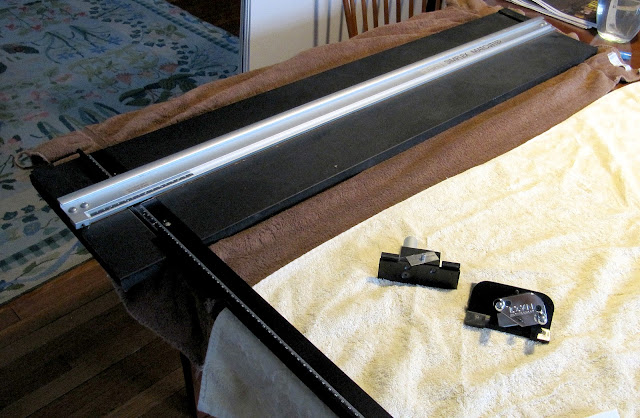
I cut all three boards (Brown mat, Beige mat, Backing board) to the dimensions of the framed art, which I decide will be 26"x30".  I have a Logan mat cutter that is 25 years old and still going strong, and I use it for all my mats and boards.  Like they say in carpentry, measure twice, cut once.  Acid free mat boards are expensive and you don't want to mess one up.  I usually do my cutting on a table in the basement but I needed more room and more light since I was photographing the process.  So I laid out some towels on my dining table and put the mat cutter on them.  This protected the table and all the items laid out on it.


The Logan comes with two cutters: a straight edge cutter and the bevel mat cutter.  Both run on the silver track for straight, perfect cuts.


This is how I mark my boards:  the lowest mark is the straight cut line for the outside size of the mat, while the straight  horizontal line is for the horizontal mat cut and the tiny vertical line just above it marks the end of that cut and the start of the vertical mat cut.  The lowest layer is going to be beige, and each arm will be 3 3/4" wide.  The picture below is of the brown mat that will go on top of the beige, and so needs to be a thinner width so the beige will show through.  The brown layer's arms will only be 3 3/8" wide.  The two mats should not have the same size of "arms" or the same size opening.


I slip the 30/32" x 40" board beneath the straight edge arm of the mat cutter.


Making a straight edge cut to reduce the board down to 26" x 30".


Now for cutting the mat openings, I change to the bevel mat cutter and place the mat on the cutting board so that the long pencil lines of the horizontal cuts are visible to me.  Line up the cutting arm with the small vertical marks.  My version of the Logan mat cutter needs a scrap board inserted below the mat or the mat blade will cut into the pressboard surface of the mat cutter itself.  So I save my 30" or 40" pieces of mat board that I just cut off to use for that.


 Begin and end by lining up the bevel cutter with the long horizontal pencil lines.  You see there are two lines?  Well, I measured incorrectly the first time, but caught my mistake when I checked it.  This is why I need only two long horizontal pencil lines - so I can see when my blade cutter lines up with my markings at the top of the cut, and the bottom of the cut.  When I cut along the pencil lines I will use the vertical cuts I made as marks as where to begin and end.


When your blade gets dull, change it!  This is what happens - the cut doesn't go all the way through and  one gets a ragged edge.  I gently sand off this rough edge with super fine sandpaper.  I was framing 3 pieces of art at this time, so the mat below was for another painting.


To be continued...

Jody

[Etsy+avatar.jpg]
Send feedback

Wednesday, May 16, 2012

Craft Show Preparation (Part 1 of 2)

Norma Rudloff runs the shop Dough Roses and has almost 30 years of show experience under her belt. She was asked to share her insight on preparing for a craft show and how to deal with the unexpected stress it can bring and hope make the experience easier.  This will be broken up into two blog posts where this week we learn about the standard preparation.


Filling out the show application is the first step in the process of doing a show. Receiving the acceptance letter is the second, and then you start asking the big question "Now What?" Whether it's a little one day church show with a 6' table supplied by the church or a four day event requiring a backdrop and sides, the process is the same -good planning and a list!

THE LIST
A list will save you grief as you start your planning for the show. From the sales support that you pull together - your business cards, sales books, brochures, and anything else that you might use to advertise yourself and your business to the little things that you might want to stash away in a plastic tub like scotch tape, a stapler, duct tape, scissors, and bags to put all of your wonderful sales into. Your list will save time and effort as the show grows closer!

SALES SUPPORT
You might find it beneficial to have a sign with the name of your business displayed along with business cards & free materials to be given out to your customers. Consider hang tags for every item you sell - giving the customer a little information about the item, what it's made from, who designed it etc. along with your name or the name of your business and how that customer can reach you in the future for repeat business.

DISPLAY
For anyone new to the world of craft shows, I've always recommended walking a couple of shows before doing one just to see how others are displaying their work and to get ideas as to how to effectively display without resorting to just laying everything flat on a table. It's important to think about how to get the items at eye level of the customer walking up to your table or into your booth while planning on safety at the same time. If using a table as a base, don't use a wrinkled bed sheet or gaudy flowered table cloth to cover it. Three yards of polyester fabric will cover an 8' table and look nice as it doesn't wrinkle. Suspender clips or safety pins should be used to pin the ends so no one trips on it. There are many ways to create an interesting display but keep in mind that you have to transport it too! Put a lot of thought into what will work best for you and your creations!

INVENTORY

How much to take? Years ago, the rule of thumb for a show to be considered a "good show" was 10 x the space fee. In today's economy, since I'm no longer doing large shows, I don't know if that can still be expected.  If I signed up for a show and paid $100 for the space fee, I could easily expect to earn $1,000 or more at that show. To accomplish making $1,000, I felt that I had to take at least 3x that amount in inventory value. I've done shows that had space fees of $600 which meant that I had to plan on over $18,000 in inventory and a way to transport it and a display to show it all properly. (By that time, I had invested in ProPanels and a U-Haul trailer!)

Speaking of show fees, you might think that you are risking less by signing up for shows that have low fees. Not if no one comes! Most of the time, the one thing that you get for the higher fees is advertising! Without that, a show is destined to be a dud and a complete waste of your time!


Next week Norma will share safety, the benefits of having Insurance, show etiquette and sales tax