Showing posts with label decorating. Show all posts

Monday, November 10, 2014

In My Studio: How to make a Family Photo Wall


After a wonderful summer family photo shoot I finally got around to hanging some of the photos along with some old favorites. I thought I would share with you how I went about doing it and the final results.

1) Firstly I looked at the space which I wanted to hang the photos and decided I wanted to hang nine photos in a square formation.

2) Next I looked through my files of pictures and made a selection of photos I liked. I made a folder of possible photos to use.

3) I then looked at the shortlisted folder to see if there was a common color running throughout the collection. Selecting a common color such as this will make for a more cohesive collection and more pleasing results. Looking at my folder of photos I saw that a common color shared by some of the photos was red. The photos that did not have any red in I decided to print out in black and white instead.


Grid marked on a piece of paper
4) I wanted to frame the pictures in very simply clip frames which do not have a border. I ordered these from Quadro Frames which offered a good range of sizes, I went for a pack of 10 x10 inch frames.

5) I downloaded my selected photos onto Mpix as this website offered 10 x 10 as a standard size. I cropped the photos to become squares during the ordering process. For the photos I would be printing in color I selected the Fuji Pearl finish which gives the pictures a gorgeous pearlised sheen. I selected black and white for the photos which did not fit into my color story.


Grid taped to the wall in the correct position
6) After receiving my frames and photos in the mail and putting them together I then marked a grid on a large piece of paper. This grid showed each frame in an exact square formation with the same width between each photo.


7) I taped this on the wall ensuring that the top line was exactly horizontal using a spirit level. I then hammered in the picture hooks through the paper.

8) When all the tacks were in place I ripped the paper off and hung the pictures up.


9) I moved them around and tried different orders before I settled on the final layout:


I was very pleased with the results and wondering which wall to tackle next.......

Good Luck and Good Making!

Sarah Omura
So Handmade

Monday, October 21, 2013

DIY Tutorial: Shadow Box Halloween Decoration

Looking for a unique Halloween decoration? A shadow box is a great way to create your own dimensional Halloween art. Using just layers of paper, you can create a spooky, ethereal scene, great for tabletop or window decor. The same idea can be used for any holiday theme!

Materials:
1. Paper or card stock. I used white card stock, black card stock, silver paper, white and red vellum, and dark blue paper for the background.
2. Shadow box frame.
3. Scissors or X-acto knife with #11 blades.
4. Self-healing mat or cardboard to cut on.
5. Ruler for cutting straight lines.
6. Tape and white glue.

To create your design, you need to plan out how many layers of paper you will use. You can draw your own design, find a design template, or cut out collage images to use. For my shadow box I drew a ghostly image of a mysterious woman amongst the trees. I drew the design on one piece of paper, and marked which parts will go on which layer. I used two layers of trees, the cloaked woman, a background layer, and some separate pieces of vellum to create an effect of mist.

Open your shadow box and measure the inside of the frame. This is the size of your image, but leave some extra room on top and bottom to create a folded flap that you can tape or glue to the sides of the frame. Cut out each layer, leaving a flap on each one. You will cut the flaps down to fit into the box, depending on where your layer sits. You can use an x-acto knife or scissors, making small, slow cuts with a sharp blade. Vellum is usually easier to cut with scissors, but a sharp blade will also work.

I attached the white tree layer first, and added the woman behind them, attaching her to the bottom. The silver trees were spaced behind her. Behind the trees, I added a piece of vellum on the bottom. For the background layer, I attached it to the top of the frame, and left some space open at the bottom to let light in. I cut spaces out of the paper and glued a vellum moon and some more layers of mist onto it. Use a toothpick to apply small amounts of regular white glue, or attach small bits of double sided tape. The vellum adds a nice glow when placed near any light source, and I left the back of the frame open to let the light in. You can protect the back of the frame with a piece of clear acetate or Plexiglas.

The effect this creates is of a mysterious, misty forest, using only paper, light, and the depth of the shadow box. The design options are endless to make your own art and dioramas. You can experiment with different papers and vellum, and also add in 3 dimensional objects. Have fun and a Happy Halloween!

Arwen from Arwen Designs

Monday, July 8, 2013

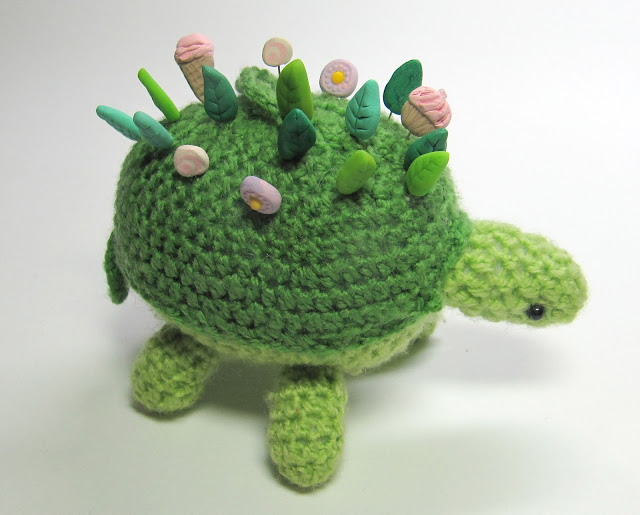
DIY Leaf Pincushion Pins

 Leaf Pincushion Pins Tutorial

For all you crafters who sew, or know someone who sews, here's a little way to green up your pincushions!

Materials:

Sculpey
x-acto blade or even a toothpick will do
foil
flat top pins or needles from the dollar store


Choose or make various shades of green by mixing the ready made colors with white or clear sculpey.  Just knead the two shades together until blended.  Roll into a tube, and cut some slices.


Make a leaf shape of a slice by rolling it into a ball, flattening it, and pinching one end.  Push in the pin or needle, and push the clay back onto the puncture so it's sealed.  Its nice to have decorative pin heads that are flat, as they are easier on the fingers and okay to iron over.


Gently press the x-acto blade or toothpick onto the top of the sculpey to make the veins of the leaf.


I got some leather punch tools to press into my sculpey pins as well!


 Place or even make the pins right on top of a small piece aluminum foil.  That way you don't even have to move them after you've formed them, which usually distorts their sides.  Bake at 275 degrees for 10 minutes and they are done!  So simple and fun!

Easter Egg by Vanessa of the Pudgy Rabbit
The Garden Party Tortoise goes on his way to new projects


Jody
www.astudiobythesea.etsy.com

Monday, January 14, 2013

DIY Bunting Tutorial

Simple Fabric Bunting


 I love the way bunting looks as decoration for a room or a display, and decided I would make some with my old Laura Ashley fabric.  I had gone to England in my twenties and bought fabric from their stores and from Liberty of London, and they've been sitting mostly in boxes since then.  It doesn't look like that particular style is coming back so this seems like a good use to put them to!


I decided on triangular flags 5" by 7.5" and cut out a pattern on graphing paper.


My supplies consisted of a yard total of different fabrics in aqua, white and lavender, a half yard of fusible web, and two packages of extra wide double fold bias tape with thread to match.


I cut 8" wide strips of fabric and folded them in half length wise or 16" wide strips of fabric and folded them over to make them 8"x45" strips.  Then I cut 8" wide lengths of fusible web, slipped them between the layers of fabric (printed side facing out) and ironed them all together.


Then I placed the pattern on the ironed fabric, marked the corners with pencil and using a metal straight edge, cut out the triangles with a fabric rotary cutter.  Then I'd just rotate the pattern and cut another triangle from the other side, so there was no wasted fabric!


When I'd finished cutting out the flags I laid them out on the table to check on the color order and the length of the bias tape, which was 3 yards.


I pinned the triangles inside the folds of the bias tape with two pins per flag - one pin isn't quite enough for me, at least.


Then I used a zigzag stitch to sew the triangles in place.  I made loops on the ends by just folding the bias tape back and zigzagging over the edges.


Done in a day and a half!


Can you guess my favorite colors?  I don't change much over the years!

Jody

www.astudiobythesea.etsy.com

[Etsy+avatar.jpg]

Saturday, December 22, 2012

Holiday Baking with Kids

Blue Snow Cookie Trees


When I baked with my kids, both of them had an egg allergy.  Since you don't want your children eating raw eggs when they taste the dough (how can they resist?) it's safer to use a shortbread recipe for making cut-out cookies.  

Cut-Out Shortbread Cookies

2 cups unsalted butter
1 1/2 cups confectioners sugar
4 7/8 cups flour
1 1/2 tsp salt

Simplest Frosting

Confectioners sugar
Milk

Equipment

Mixer
Rolling pin
Tree cookie cutters
Wilton blue sugar nonpareils/sprinkles
Food coloring
Tiny spoons

Mix butter & sugar on medium speed.  Mix salt into flour, add to butter & sugar until fully blended. Dough maybe a little crumbly but push together by hand.  Take out a 5" ball to work with at a time.  Flour a flat, clean surface.  With rolling pin roll out dough to 1/4" thick layer.  Cut with tree cookie cutters and place on baking tray.  Bake for approximately 14 minutes in middle of 325 degree oven or until edges are lightly brown.  Cool.

Wilton Sprinkles can be found at your local Michael's

I never felt that taking out the cake decorating set, with nozzles and everything else was going to be anything but an exercise in frustration for my smalls, so instead we would mix a very little milk, like two teaspoons, with a cup or more of confectioners sugar, and then add the food coloring of their choice.  It should be quite thick, not runny at all.  We would then spoon the sugar frosting on top of each cookie, spreading it in place with the back of the spoon.  Then they would add sprinkles of all sorts on top.  Then my daughter thought of dribbling a second color of frosting onto the cookie while the first layer was still wet.  She liked to make plaid Christmas cookies.  From her novel method came the idea for these pretty blue trees.

Simple and Elegant

 Mix up a bowl of white and a bowl of sky blue frosting.  Frost with the blue layer and then, before the frosting dries and sets, dribble from the tip of the spoon a zig zag of white frosting.  It may take a little practice at getting the timing and flow right. Put blue nonpareils along the white zig zag.  Let dry.  Frosting will become hard in about an hour, and then put cookies in a plastic container.

Mug from Cerulean Blue, cards from My Zoetrope and KBatty, plate from Megan Hart Porcelain 
 After all that work, it's time to relax with a little hot chocolate.  Happy Holidays, everyone!


Jody Lee

www.astudiobythesea.etsy.com

[Etsy+avatar.jpg]