Showing posts with label crafts. Show all posts

Monday, August 19, 2013

Yarn Bombed Bridge - Go Knit!

I've seen some pretty yarn bombing before but this may be one of the coolest!


The Andy Warhol Bridge in Pittsburgh has been decked out in fiber goodness through early September.   Wouldn't it be great if we can do something like on the Walkway over the Hudson?  Surely we got enough knitters in the area that can take this on right? :)


Monday, May 27, 2013

Where to Dine in Fishkill


Foodies Love Fishkill!
Main St. Fishkill, NY  photo by Daniel Case

When you come to the amazing Hudson Valley Etsy Fine Arts and Craft Fair on June 2, 2013, you should make a true excursion of it and sample some the wonderful restaurants in town.  Fishkill may not be as well known as Beacon to the west, but our local artisans have found many delightful places to satisfy every culinary craving.  Here are some of the team's recommendations, right on Main Street and not far from the fair.


845.896.0011 1111 MAIN STREET FISHKILL, NEW YORK.
Convivial bar and comfort food, pasta and steaks!  http://www.eleven11grille.com


845.896.7779     1123 MAIN STREET, FISHKILL, NEW YORK 12524  


 The Tomato Cafe is Pulp Sushi's favorite.  The four local owners and chefs provide soups, sandwiches, salads and pizza  at affordable prices and an even more enticing lunch and dinner menu of italian specialties.  http://www.tomatocafefishkill.com


Cilantro Mexican Restaurant

986 Main St, Fishkill, NY  CVS Plaza  (845) 896-8700

Cilantro Mexican Restaurant treats you to a wide array of Mexican delights.  Enjoy home style  Mexican cooking as if you were in the heartland of Mexico itself.  The restaurant is right on the plaza where the fair is taking place, so get your fix of chiles and 50 different kinds of tequila.


Tanjore

Cuisine of India
845-896-6659 992 Main St. Plaza (Route 52) Fishkill, NY

Zagat rated excellent indian cuisine!  Check out their website and all their delicious dishes and even a coupon is available.  I crave!   http://www.tanjoreindiancuisine.com


Other Restaurants:


Also right on Main St:
Cibo - http://www.yelp.com/biz/cibo-fishkill (their website is still under construction)
Locanda Trattoria - http://locandarestaurant.com/I-84 Diner (the BEST French Toast!)
Sapore Steakhouse
Friendlys
Five Guys
Also in Fishkill (Rt 9)
Pepper Thai
Cracker Barrel
Charlie Browns
Panera Bread
Maya Cafe on Rt 9 


Happy Shopping & Eating!

Jody
www.astudiobythesea.etsy.com


Monday, May 6, 2013

In My Studio: Quality Control


Sarah with a basket making group in Northern Namibia

I was lucky enough to work in Namibia in Southern Africa for 3 years helping crafts people to make and sell products for the burgeoning tourism industry.
The crafts were mainly made from natural resources such as basketry, wood carving and pottery. I helped to design products they could make which would both appeal to tourists and be easily transported.
One of the main problems with the products was maintaining good quality control. As one way to illustrate this for people who spoke many different languages we came up with a list of '10 Commandments For Making Quality Craft Products'. 
I was looking at this the other day and was amazed how relevant  it is to crafts people everywhere- including us. So I thought I would share these Namibian 10 Commandments so we can all keep in mind the importance of quality control and to remember that we are only a small part of a much larger community of crafts people working all over the world.


 Quality is remembered long after the price is forgotten. Gucci Family Slogan


Good Luck and Good Making!

by Sarah Omura, SO Handmade


Thursday, November 8, 2012

Craft DIY: 6 Pointed Snowflake Tutorial

Today we have a great tutorial from Arwen from Arwen Designs - who specializes in making greeting cards using paper cut art.  Hope you enjoy it!

Making cut paper snowflakes is a fun winter activity, and a great craft that kids and adults alike will enjoy. They look great lining your window as holiday decorations, or even framed on your wall. Part of the fun is seeing how they will come out. Just like real snowflakes, no two are ever quite the same! Here is a tutorial for making a 6 pointed snowflake, which looks more natural because that is how snowflakes are actually formed.


Materials:

1. Paper. The paper I used is regular white 8.5” x 11” printer paper, which is cost effective and readily available. You can also try all sorts of colorful papers, including scrapbook papers and even gift wrap. Thin papers will be easier to cut through with scissors.

2. Scissors. I used regular household scissors, with a fairly sharp blade. Scissors with a very small sharp blade, like nail scissors, would enable more delicate cuts.   Take the sheet of paper and fold it over to make a triangle (A). Cut off the excess. This basically makes it a square, if you are starting off with a square sheet, you can just fold it over. Now fold it over again to make a smaller triangle (B).


Re-open the fold you just made, and now comes the tricky part. You have to fold it into thirds so it looks like (C). Fold over onto itself from the left and right sides, using the middle fold line as sort of a guideline. The three sections should be as even as you can get them. Now fold this whole piece in half, so it looks like (D).

Take your scissors and cut the top off at an angle so it looks like (E). The angle can vary, it just has to cut off all uneven edges.

Now you are ready to cut out your design (F)! The bottom point will be the center of the snowflake. You will want to cut away a lot of the paper, and not leave any areas too thick or the snowflake will look blocky. The last photo shows how this design looks unfolded. As you experiment, you will get used to how the cuts will look when the snowflake is opened, and where you want to cut away more and less paper.

There are many creative ways to use your designs. One way I’ve used them is to integrate snowflakes into my cut paper art. I scan them into the computer along with my artwork, and work with them in Photoshop. Here is an example: http://www.artistrising.com/products/612278/Winter-Love.htm

So when the snow starts falling outside, grab some paper and scissors, and have fun!

Thursday, October 25, 2012

Hanging Paper Lantern / Luminary Tutorial


Paper lanterns or luminaries are simple and elegant, and are a great addition to parties and weddings, or as decorations around the home. You can make your own paper lantern with a few simple materials. Here is a tutorial for a small luminary, using one of my Halloween designs.

Materials:
1. Paper. The paper I used is black cardstock and gold vellum. Cardstock comes in many colors and textures. The translucent vellum is what diffuses the light and makes the lantern glow. You can use any color vellum, just keep in mind what color your tea light is, as it will affect the look of the vellum.
2. X-acto knife with #11 blades.
3. Self-healing mat or cardboard to cut on.
4. Ruler for cutting straight lines.
5. Double sided tape or glue dots, double sided foam tape.
6. Battery operated tea light.
7. Ribbon.

You can refer to my tutorial for Cut Paper Silhouettes for ideas on finding a design and transferring it to paper.  For black cardstock, I would use the method of laying a print of the design on top of your cardstock, and cutting through both layers. Another method is to use transfer or carbon paper to trace the design onto the cardstock.

Measure the width of your tea light, then add a little extra space. This is the width of your bottom piece. I used a standard tea light, and made the bottom 2” wide. Then measure an equal distance on either side. I used an 8.5” x 11” sheet of paper for the whole design, cut in half, so that the whole piece laid flat measures 11” x 4.25”.

Transfer your design onto the cardstock. To make a double sided lantern as shown, you will need to flip or reverse the design on the other side (like a mirror image). Make sure your design leaves enough of a border so that the cardstock will be sturdy. Too thin of border will make it weak once everything is cut out. On the top of each side, I added a small handle with a hole for ribbon to go through. This was added in the design, so it is all cut out of one piece of paper.

Cut the design out with your x-acto knife, on your self-healing mat. Make slow, small cuts, and make sure your blade is sharp. Since cardstock is thick, you may have to go over some lines more than once, especially any corners. Score lines to fold where you measured your bottom 2” area, and fold the sides up. The picture shows how it looks once the two sides are cut out, and the lines are scored.

Cut out two pieces of your vellum, slightly bigger than the opening of your design. Attach these inside using double sided tape or glue dots. Position your tea light on the bottom piece, and figure out where the on/off switch is. Cut a small hole in the bottom so that you can reach the switch. Attach the tea light to the bottom with double sided foam tape.

Attach the paper together at the top with tape or glue dots, and tie a ribbon or cord through the hole. Turn on the light and enjoy your creation! You can sit this on a table or hang it from the ribbon. Hang a row of lights in a darkened room to create a magical atmosphere!

The luminary pictured here is available in my Etsy store.

Arwen from Arwen Designs

Monday, August 27, 2012

DIY Tutorial: Drawing on Stones

Memories of Summer

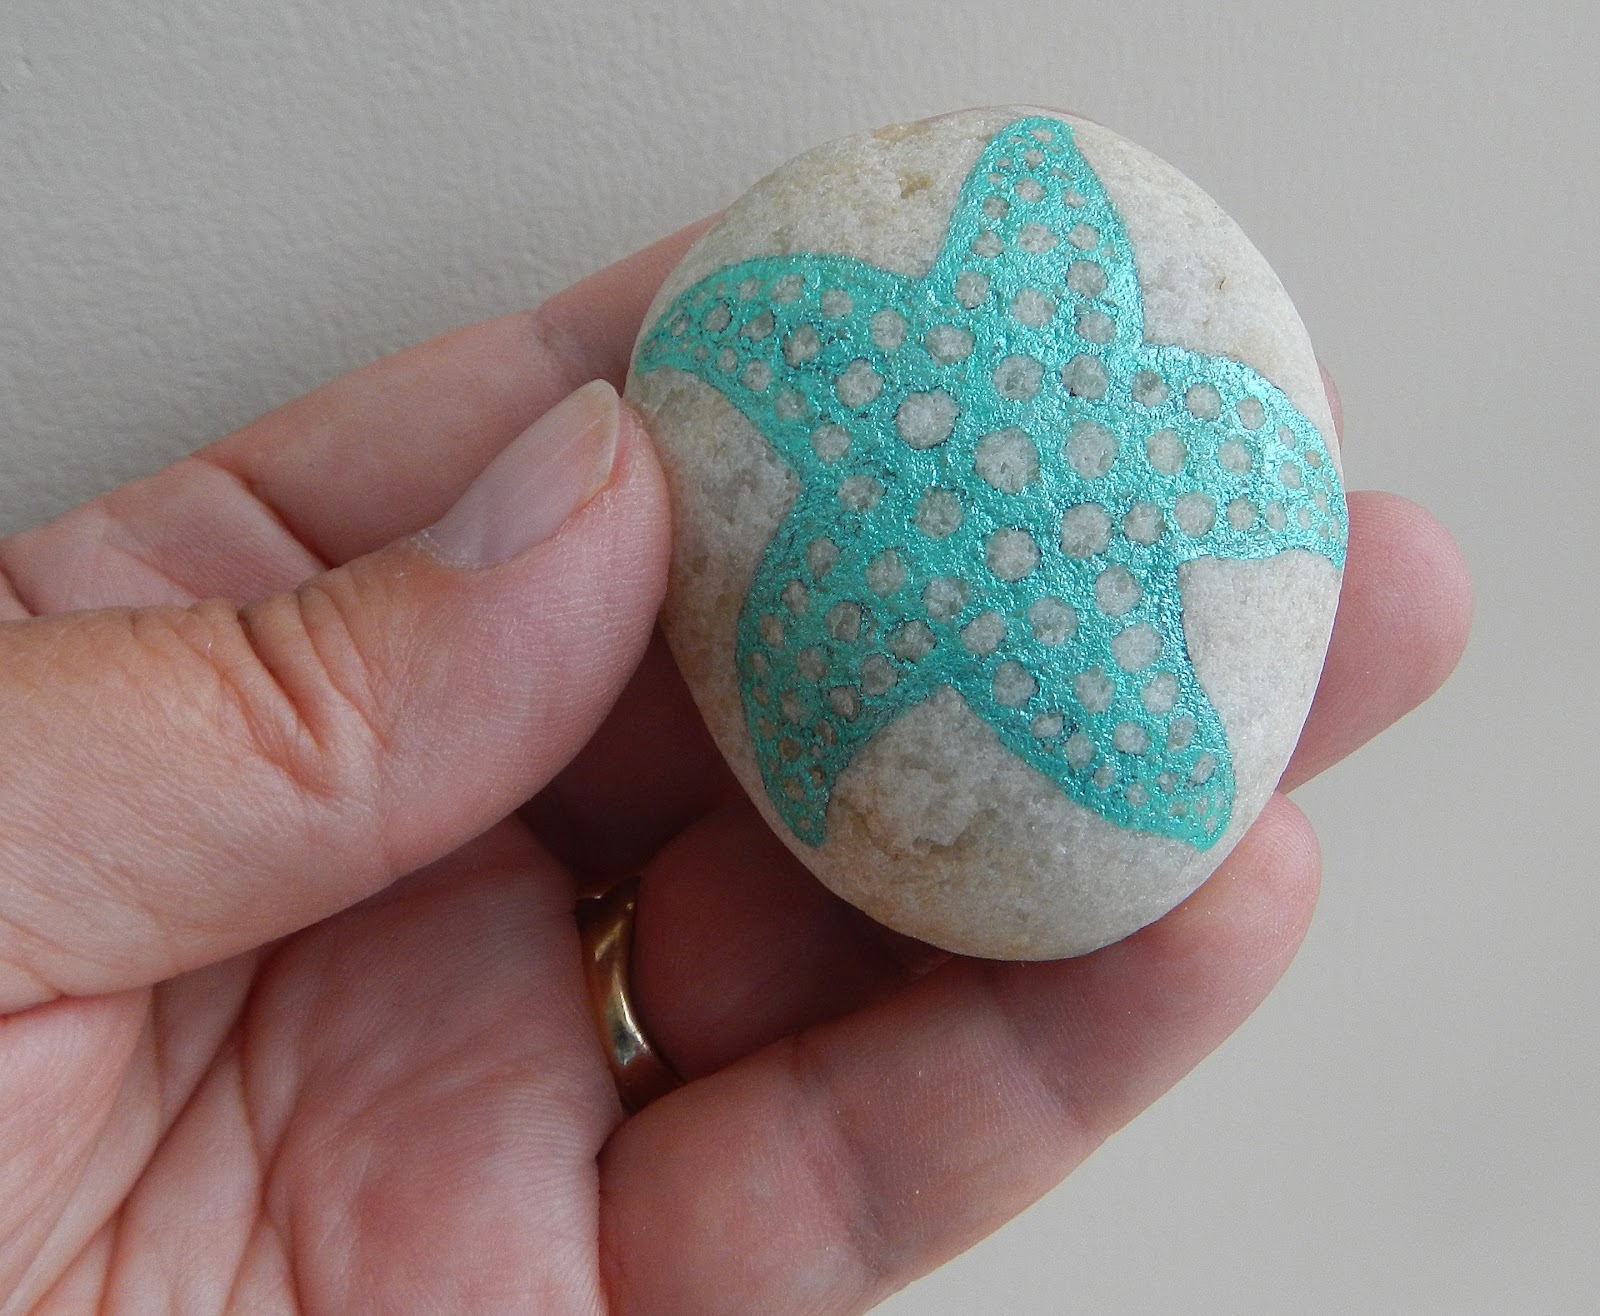
I was spent several days on Shelter Island in June and collected a bag full of smooth white stones from the seashore.  I thought they would make nice mini-canvases for some simple drawings or doodles.  Below are the steps for making the simplest of paperweights and a little record of the events of the summer.

Shelter Island
Clean your stone so that it is free of dirt or seaweed.  Draw your design in pencil.


  I will use pictures for reference, but this is just a simple starfish.


FW Inks are permanent and opaque.  You can use either a very fine brush or a pen for your drawing.  Keep a cup of water handy for rinsing out your brush or pen before the ink starts to clog.  Hold the stone in your non-drawing hand and turn it so the surface you’re working on faces you.  Steady your drawing hand by keeping part of your palm or wrist on the table or tucked against your side.  Clean off excess dried ink on your brush or pen with a tissue.


FW Ink dries quickly.  If you make a mistake you will have to sand it off!  When your drawing is finished and the ink is dry, use a kneaded rubber eraser to remove the graphite pencil lines that are left. 


Finished!

I found these stones useful for keeping my papers in place when the ceiling fan was on!

Jody Lee

[Etsy+avatar.jpg]

Friday, April 20, 2012

Where to Find the Hudson Valley Etsy Team This Weekend!

On Sunday, April 22, take a little road trip and join Hema of Anjali Creations at the Clifton Jewish Center Arts & Crafts Show at 18 Delaware Street in Clifton, NJ. The show runs from 9:30 am until 4:30 pm. Hema creates necklaces, bracelets, earrings, handmade greeting cards, wine charms, and gifts that celebrate the diverse paths to spiritual growth.